MF52A Thermistor

Arduino Workshop

What is the MF52A Sensor?

The MF52A is a thermistor - a type of resistor whose resistance changes with temperature.

  • NTC Type: Negative Temperature Coefficient - resistance decreases as temperature increases
  • Resistance at 25°C: Typically 10kΩ (10,000 ohms)
  • Temperature Range: -55°C to +125°C
  • Applications: Room temperature monitoring, weather stations, HVAC systems

How Does a Thermistor Work?

A thermistor's resistance changes predictably with temperature:

  • Cold Environment: High resistance (more opposition to current flow)
  • Hot Environment: Low resistance (less opposition to current flow)

By measuring the resistance, we can calculate the temperature using the Steinhart-Hart equation or a simplified B-parameter equation.

Key Point: Arduino can't measure resistance directly - it measures voltage. We'll use a voltage divider circuit!

Wiring the MF52A to Arduino

We'll create a voltage divider circuit with two resistors:

  • Component 1: MF52A thermistor (variable resistance)
  • Component 2: 10kΩ fixed resistor

Connections:

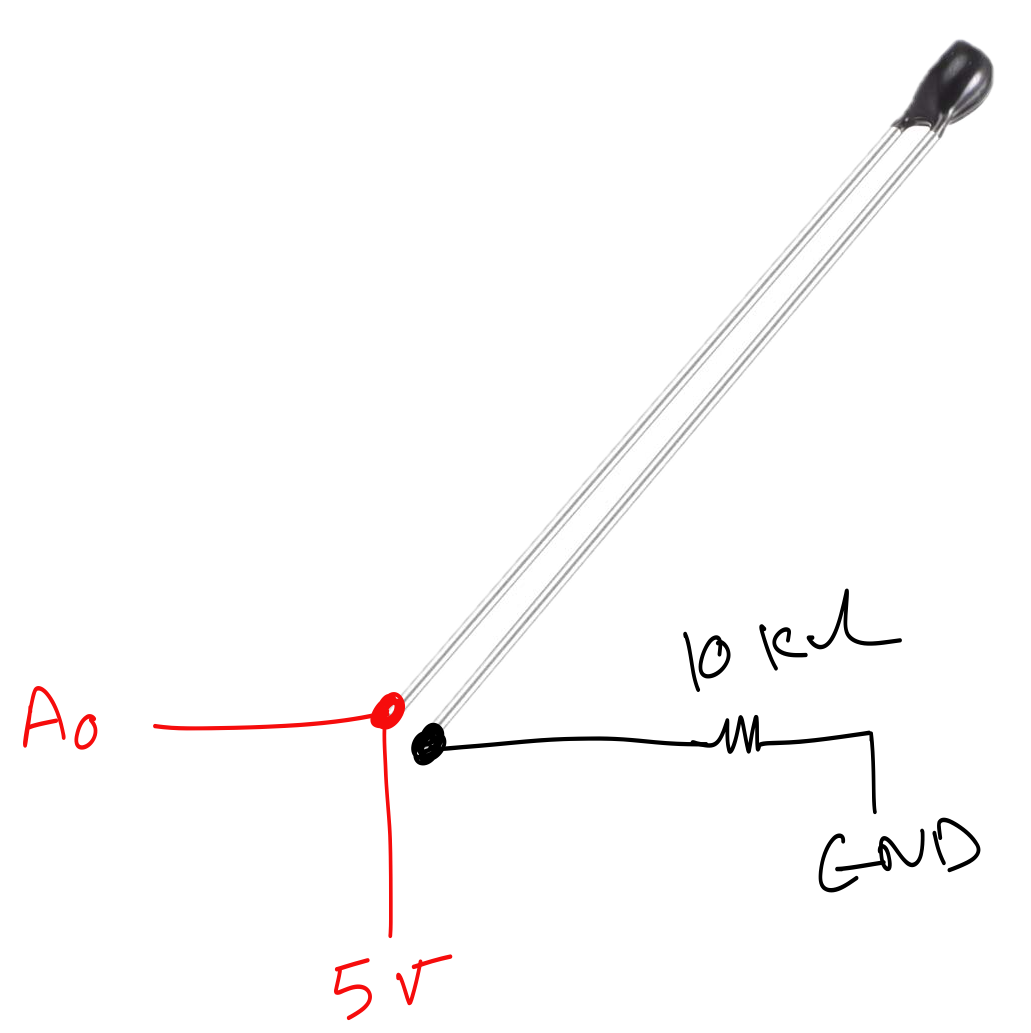
  • 5V → Thermistor → A0 (analog pin) → 10kΩ resistor → GND
  • The middle connection (between thermistor and fixed resistor) goes to analog pin A0

This circuit converts changing resistance into changing voltage that Arduino can read!

MF52A Wiring Diagram

Reading Analog Values

First, let's read the raw analog value from the sensor.

Arduino's analogRead() function returns a value between 0-1023, representing 0V to 5V.

const int sensorPin = A0;

void setup() {
  Serial.begin(9600);
}

void loop() {
  int rawValue = analogRead(sensorPin);
  
  Serial.print("Raw Value: ");
  Serial.println(rawValue);
  
  delay(1000);
}

Converting to Voltage

Next, we convert the raw value (0-1023) to actual voltage (0-5V).

Formula: Voltage = (rawValue / 1023.0) × 5.0

const int sensorPin = A0;

void setup() {
  Serial.begin(9600);
}

void loop() {
  int rawValue = analogRead(sensorPin);
  float voltage = rawValue * (5.0 / 1023.0);
  
  Serial.print("Voltage: ");
  Serial.print(voltage);
  Serial.println(" V");
  
  delay(1000);
}

Calculating Thermistor Resistance

Using voltage divider formula, we can calculate the thermistor's resistance.

Formula: R_thermistor = R_fixed × (V_in / V_out - 1)

Where R_fixed = 10kΩ, V_in = 5V, V_out = measured voltage

const int sensorPin = A0;
const float R_fixed = 10000.0; // 10k ohms

void setup() {
  Serial.begin(9600);
}

void loop() {
  int rawValue = analogRead(sensorPin);
  float voltage = rawValue * (5.0 / 1023.0);
  
  float resistance = R_fixed * (5.0 / voltage - 1);
  
  Serial.print("Resistance: ");
  Serial.print(resistance);
  Serial.println(" ohms");
  
  delay(1000);
}

Converting Resistance to Temperature

We use the simplified Beta equation for temperature calculation.

Parameters needed:

  • R0 = 10000 (resistance at 25°C)
  • T0 = 298.15 (25°C in Kelvin)
  • Beta = 3950 (B-value for MF52A)
const float R0 = 10000.0;
const float T0 = 298.15; // 25°C in Kelvin
const float Beta = 3950.0;

float calculateTemperature(float resistance) {
  float steinhart;
  steinhart = resistance / R0;
  steinhart = log(steinhart);
  steinhart /= Beta;
  steinhart += 1.0 / T0;
  steinhart = 1.0 / steinhart;
  steinhart -= 273.15; // Convert to Celsius
  
  return steinhart;
}

Complete Temperature Sensor Code

Here's the full program that reads temperature and displays it in Celsius and Fahrenheit.

const int sensorPin = A0;
const float R_fixed = 10000.0;
const float R0 = 10000.0;
const float T0 = 298.15;
const float Beta = 3950.0;

void setup() {
  Serial.begin(9600);
}

void loop() {
  int raw = analogRead(sensorPin);
  float voltage = raw * (5.0 / 1023.0);
  float resistance = R_fixed * (5.0 / voltage - 1);
  
  // Calculate temperature
  float tempK = 1.0 / ((log(resistance/R0) / Beta) + (1.0/T0));
  float tempC = tempK - 273.15;
  float tempF = tempC * 9.0/5.0 + 32.0;
  
  Serial.print("Temperature: ");
  Serial.print(tempC);
  Serial.print(" °C / ");
  Serial.print(tempF);
  Serial.println(" °F");
  
  delay(1000);
}

Hands-On Experiments

Try these experiments with your temperature sensor:

  • Room Temperature Monitor: Measure and log room temperature over time
  • Heat Response: Gently warm the sensor with your finger and watch values change
  • Temperature Alarm: Add an LED or buzzer that activates above a certain temperature
  • Data Logger: Store temperature readings to SD card or send to computer
  • Comparison Test: Compare readings with a commercial thermometer