DHT11 Temperature & Humidity Sensor
Arduino Workshop
What is the DHT11 Sensor?
The DHT11 is a basic, low-cost digital temperature and humidity sensor. It's perfect for beginners learning about environmental sensing with Arduino.
Key Features:
- Measures temperature: 0-50°C (±2°C accuracy)
- Measures humidity: 20-90% RH (±5% accuracy)
- Digital output - easy to read!
- Single wire communication protocol
- Low cost and widely available
How Does DHT11 Work?
Inside the sensor:
- Humidity Sensing: Uses a moisture-holding substrate between two electrodes. As humidity changes, conductivity between electrodes changes.
- Temperature Sensing: Contains a thermistor (temperature-sensitive resistor) that changes resistance with temperature.
- Digital Conversion: A built-in chip converts analog readings to digital signals and sends them to Arduino.
The sensor communicates using a proprietary single-wire protocol, sending 40 bits of data (humidity + temperature + checksum).
DHT11 Pin Configuration
The DHT11 sensor has 3 or 4 pins (depending on the module):
- DATA: Digital signal output (denoted by s)
- VCC: Power supply (3-5V)
- GND: Ground (denoted by -)
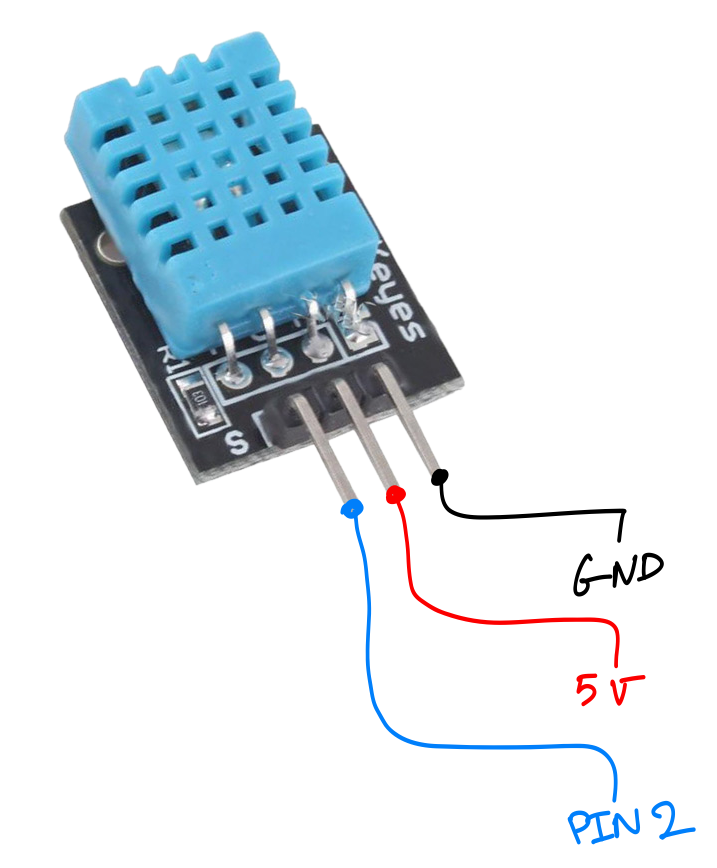
Wiring DHT11 to Arduino
Connection Steps:
- Connect DHT11 VCC to Arduino 5V
- Connect DHT11 GND to Arduino GND
- Connect DHT11 DATA to Arduino Digital Pin 2
Safety Check:
- Double-check all connections before powering on
- Ensure VCC and GND are not reversed
- Make sure connections are secure
Installing the DHT Library
To communicate with the DHT11, we need to install a library that handles the complex timing protocol.
Installation Steps:
- Open Arduino IDE
- Go to Sketch → Include Library → Manage Libraries
- Search for "DHT sensor library" by Adafruit
- Click Install
- Also install "Adafruit Unified Sensor" (dependency)
Once installed, you can include it in your sketch with: #include <DHT.h>
Basic Code Setup
First, we include the library and define our sensor configuration.
Key elements:
- Include DHT library
- Define the pin number
- Specify sensor type
- Create DHT object
// Include the DHT library
#include <DHT.h>

// Define the pin connected to DATA
#define DHTPIN 2

// Define the sensor type
#define DHTTYPE DHT11

// Create DHT object
DHT dht(DHTPIN, DHTTYPE);
Setup and Loop
In setup(), we initialize serial communication and start the sensor.
In loop(), we read and display the sensor data.
Note: DHT11 has a 2-second sampling rate, so we add a delay between readings.
void setup() {
  // Initialize serial communication
  Serial.begin(9600);
  Serial.println("DHT11 Test!");

  // Start the sensor
  dht.begin();
}

void loop() {
  // Wait 2 seconds between readings
  delay(2000);

  // Read sensor data
  float humidity = dht.readHumidity();
  float temperature = dht.readTemperature();

  // Display the results
  Serial.print("Humidity: ");
  Serial.print(humidity);
  Serial.print(" %  Temperature: ");
  Serial.print(temperature);
  Serial.println(" °C");
}
Adding Error Handling
Sometimes sensors fail to read. It's good practice to check for errors using isnan() function.
Why add error checking?
- Loose connections
- Sensor malfunction
- Timing issues
void loop() {
  delay(2000);

  float h = dht.readHumidity();
  float t = dht.readTemperature();

  // Check if readings failed
  if (isnan(h) || isnan(t)) {
    Serial.println("Failed to read from DHT sensor!");
    return;
  }

  // Display valid readings
  Serial.print("Humidity: ");
  Serial.print(h);
  Serial.print(" %  Temperature: ");
  Serial.print(t);
  Serial.println(" °C");
}
Testing Your Sensor
Upload and Test:
- Upload the code to your Arduino
- Open the Serial Monitor (Tools → Serial Monitor)
- Set baud rate to 9600
- You should see temperature and humidity readings every 2 seconds!
Common Issues:
- "Failed to read": Check wiring, ensure sensor is powered
- Strange values: Sensor might be damaged or wrong sensor type defined
- No output: Check Serial Monitor baud rate matches code (9600)
Challenge: Try breathing on the sensor to see humidity increase!