Part 1: The Arduino Side - Reading and Sending Data
First, we need to wire the joystick to the Arduino and write a sketch to read its values and send them over the serial port.
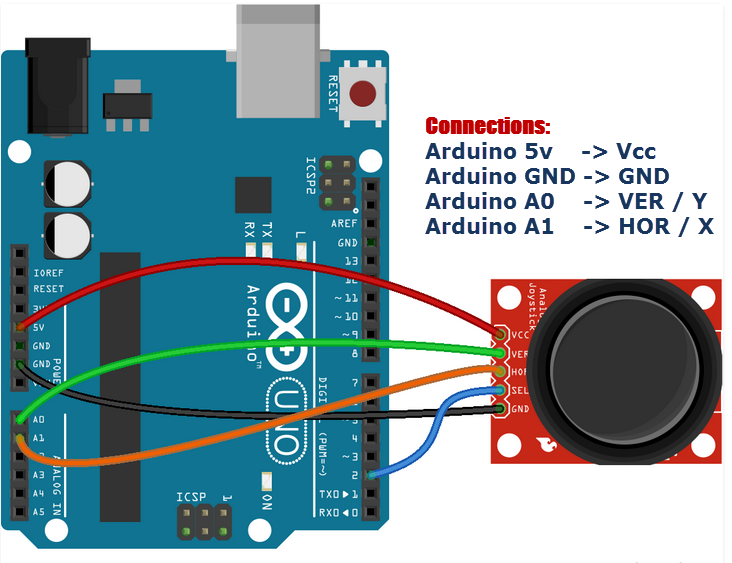
Circuit Diagram
Connect your joystick module to the Arduino Uno as shown below. Joystick modules typically have 5 pins:
- GND: Connect to GND on the Arduino.
- +5V: Connect to 5V on the Arduino.
- VRx: The X-axis output. This is an analog signal. Connect to an analog pin (e.g., A0).
- VRy: The Y-axis output. This is an analog signal. Connect to another analog pin (e.g., A1).
- SW: The switch/button press. We will not use this pin for this assignment.
Arduino Sketch
The Arduino sketch should perform these steps in a loop:
- Read the analog value from the X-axis pin (A0).
- Read the analog value from the Y-axis pin (A1).
- Format these two values into a single string, separated by a comma (e.g., "512,510").
- Send this string over the serial port using
Serial.println().
- Add a small delay to avoid flooding the serial port with too much data.
Here is a starter code snippet. You will need to complete it.
// Define the analog pins connected to the joystick
#define VRX_PIN A0 // Joystick X-axis
#define VRY_PIN A1 // Joystick Y-axis

void setup() {
  // Initialize serial communication at a 9600 bits-per-second baud rate.
  // This rate must match the rate used in your Python script.
  Serial.begin(9600);
}

void loop() {
  // Read the analog values from the joystick
  int xValue = analogRead(VRX_PIN);
  int yValue = analogRead(VRY_PIN);

  // Print the values to the serial port in a "x,y" format
  Serial.print(xValue);
  Serial.print(",");
  Serial.println(yValue); // println adds a newline character at the end

  // A small delay to make the communication stable
  delay(50);
}
Upload this code to your Arduino Uno. You can check if it's working by opening the Serial Monitor in the Arduino IDE (Tools > Serial Monitor). Make sure the baud rate is set to 9600. You should see a stream of numbers like 512,511 that change as you move the joystick.
Part 2: The Python Side - Receiving Data and Controlling the Mouse
Now we will write a Python script to read the data from the Arduino and move the mouse.
Python Environment Setup
You will need two Python libraries: pyserial to read from the serial port and pyautogui to control the mouse. Open your terminal or command prompt and install them using pip:
pip install pyserial
pip install pyautogui
Test Function: Reading from the Serial Port
How to Test Your Serial Connection
Before trying to control the mouse, it's very important to confirm that Python can receive data from your Arduino. Use the following test script. This script will simply print whatever it receives from the serial port to your console.
Important: You must find your Arduino's COM port name. On Windows, it looks like COM3, COM4, etc. On macOS or Linux, it's something like /dev/tty.usbmodem14101 or /dev/ttyACM0. You can find this in the Arduino IDE under Tools > Port.
# test_serial.py
import serial
import time

# --- IMPORTANT ---
# CHANGE 'COM3' to your Arduino's port.
# You can find this in the Arduino IDE under Tools > Port.
# For Mac/Linux, it will be something like '/dev/tty.usbmodemXXXX'
ARDUINO_PORT = 'COM3'
BAUD_RATE = 9600

try:
    # Establish a serial connection
    arduino = serial.Serial(ARDUINO_PORT, BAUD_RATE, timeout=1)
    time.sleep(2) # Wait for the connection to establish

    print(f"Connected to Arduino on {ARDUINO_PORT}. Reading data...")
    print("Move your joystick to see the values change.")
    print("Press Ctrl+C to exit.")

    while True:
        # Read one line of data from the serial port
        data = arduino.readline()

        # Check if any data was received
        if data:
            # Decode the bytes into a string and remove leading/trailing whitespace
            decoded_data = data.decode('utf-8').strip()
            print(f"Received: {decoded_data}")

except serial.SerialException as e:
    print(f"Error: Could not open port {ARDUINO_PORT}. {e}")
except KeyboardInterrupt:
    print("\nProgram terminated by user.")
finally:
    if 'arduino' in locals() and arduino.is_open:
        arduino.close()
        print("Serial port closed.")
Run this script from your terminal: python test_serial.py. If everything is set up correctly, you should see the same coordinate stream that you saw in the Arduino Serial Monitor.
Troubleshooting
- Access Denied / Port Busy Error: Make sure the Arduino IDE's Serial Monitor is closed! Only one program can use the serial port at a time.
- No Data Received: Double-check that the
ARDUINO_PORT is correct and that the BAUD_RATE (9600) matches the one in your Arduino sketch.
Main Task: Controlling the Mouse
Once your test script works, you can move on to the main task. You need to modify the script to:
- Parse the incoming string (e.g., "512,510") to get separate X and Y integer values.
- Get the size of your computer screen.
- Map the joystick's analog values (0 to 1023) to your screen's pixel coordinates (e.g., 0 to 1920 for width, 0 to 1080 for height).
- Use the mapped coordinates to move the mouse pointer using
pyautogui.moveTo().
Hints for the Main Script
Here is a skeleton to guide you. You need to fill in the logic inside the `while` loop.
# joystick_mouse.py
import serial
import pyautogui
import time

# --- Configuration ---
ARDUINO_PORT = 'COM3' # CHANGE THIS to your Arduino's port
BAUD_RATE = 9600

# Get screen dimensions
screenWidth, screenHeight = pyautogui.size()
print(f"Screen size: {screenWidth} x {screenHeight}")

# Establish serial connection
arduino = serial.Serial(ARDUINO_PORT, BAUD_RATE)
time.sleep(2) # Wait for connection

print("Starting mouse control. Move the joystick.")
print("Press Ctrl+C to exit.")

try:
    while True:
        # 1. Read a line from the Arduino
        data = arduino.readline().decode('utf-8').strip()

        # 2. Make sure the data is not empty
        if data:
            try:
                # 3. Split the string into two parts and convert to integers
                x_str, y_str = data.split(',')
                x_val = int(x_str)
                y_val = int(y_str)

                # 4. Map the joystick values (0-1023) to screen coordinates
                # The joystick's X-axis might be inverted, so we map 1023-0 instead of 0-1023.
                # You might need to adjust this based on your joystick's orientation.
                mouseX = (x_val * screenWidth) / 1023
                mouseY = (y_val * screenHeight) / 1023

                # 5. Move the mouse to the new coordinates
                pyautogui.moveTo(mouseX, mouseY)

            except (ValueError, IndexError):
                # Handle cases where the data is not in the expected "x,y" format
                print(f"Warning: Received malformed data: {data}")
                continue

except KeyboardInterrupt:
    print("\nProgram terminated.")
finally:
    arduino.close()